

All images and content are © Copyright of Cake Trails.
Showing posts with label fondant. Show all posts
Showing posts with label fondant. Show all posts
Monday, September 30, 2013
Fireman Sam cake
Tuesday, September 3, 2013
Horse cake

I made this cake for a friend's daughter who loves horse riding. She didn't want any too complicated so I made a simple horse topper for the cake and added some fondant flowers, butterflies and buttercream grass to finish the effect. The horse is made out of gumpaste. The cake is covered in green buttercream and I made some swirling effects with the end of the spatula.
The birthday girl loved it and so did I. :)
Tuesday, July 2, 2013
Purple ombre cake {Tutorial}

I have been wanting to do an ombre cake for a while now, and when my dear friend's birthday came round, I decided it would be a perfect opprtunity. I have to say though that it is a LOT of work, most of which comes from making all the frills for the cake and making sure they line up properly. That was the most time consuming bit for me, but well-worth it in the end. The cake looked so pretty and frilly and I was really pleased with it. Unfortunately, I ran out of time and did not get a chance to take any good photos of the cake. So remember, if you are planning to attempt this, give yourself a lot of time!
For those of you keen to try this,
Monday, May 27, 2013
Hobbit Hole 'Bag End' Cake
This cake was made for my hubby who is a huge LOTR (Lord of the Rings) fan. Every year, he comes up with a different themed cake. Last year was Stargate (see cake here) and the year before that was Star Wars (see cake here).
So this year, of course, it had to be Lord of the Rings. :)

The cake is a dark chocolate mud cake layered with dark chocolate ganache and covered in fondant details as well as Swiss Meringue buttercream icing (SMBC). If you have not tried SMBC, you should definitely give it a go! It is not overly sweet like normal buttercream icing and has a very smooth and satiny finish. More on that in another post!
Here are a few more close ups...
Wednesday, May 1, 2013
Stiletto heel and shoe box cake

I am really pleased with how this cake turned out! This is a model for a class I want to teach. The gumpaste shoe took a lot of patience to do. There was a lot of waiting in between, waiting for each part to hurry up and dry before another layer could be applied, but I am really pleased with how it turned out. The shoe box is a dummy cake, which I covered in fondant. The letters were cut out of the alphabet set from Patchwork cutters. All in all, I am really happy with it. :)
Thanks for looking!
Sunday, March 17, 2013
Kokeshi Japanese doll cake

Christmas cake and cookies gift
It's been so long since I have blogged I can't believe it's March already! Our computer decided to have a meltdown at the end of last year and so I haven't been able to put up any pictures of what I've been up to.
Well I decided to switch it on again today and lo and behold it is up and running again! Maybe it just needed a holiday too!
Well this post is either very late or very early but I thought I should post some pictures of a Christmas cake and cookie tree stack I did. The cake is fruit cake and the cookies are lemon based shortbread.

Roll a sheet of white fondant as your base. Then overlap with strips of red at even intervals. Gently roll over the strips with your rolling pin so the red fondant merges with the white. Cut out strips for your bow and ribbon and you have your striped ribbon. I used a new set of cutters from Patchwork for the letters. A bit fiddly but I am sure I will get the hang of it soon. I then painted the letters with edible gold paint.

The cookie stack was a lot of fun to do. I baked lots of star shaped cookies in various sizes using the Wilton star cookie cutter set, decorated them with royal icing and silver dragees and then stacked them together, criss crossing the cookies along the way to get the effect you see in the picture below.

Thanks for looking!
Monica
Friday, October 19, 2012
Puppy cake - woof!

My friend's daughter just turned 6! I have been making their cakes now for the last 3 years and I have to say this is probably one of my favourites. I loved making this cake! And I am so pleased with how it turned out. This is a Debbie Brown design and I changed the colours around to suit the little girl's request. The cake is made with the Wilton sports pan (for the head) and Wilton's soccer pan (for the body). The checkerboard pattern took ages to do but I was quite happy with how it turned out and brightened the cake as well. The letters are cut from FMM funky alphabet cutters, which I love using. I added some bling to his collar using blue cauchous. All in all, a very easy cake to make.

Giant cupcake

I finally got to try out my new giant cupcake pan from Baker's Secret. After reading all the recommendations online on whether to bake the top and bottom half of the cake at the same time, I went with the 10-15 minute gap by baking the bottom half first for 10 minutes then adding the batter to the top half after that. Both halves baked almost to the same time after that. The only issue I had was trying to get it out of the pan all in one! I should have greased and floured the pan but decided to go ahead and not do it. Big mistake! Always grease and flour your pans before adding the batter and the cakes with pop out with no issues. Anyway I did finally get most of the cake out in one piece, thank goodness.
This cake is carrot cake with loads of cream cheese icing on top as well as in between the top and bottom halves. Bottom half is covered in strips of fondant and the top is sprinkled with giant sprinkles made from fondant circles. I did try rolling a large strip of fondant around the bottom half but it came out looking like a bowl instead, hence the individual strips. Will have to try again, maybe with buttercream icing as cream cheese is rather soft and doesn't give a good undercoat. Tasted yummy though! :)
Monday, September 3, 2012
'Taylor Swift' birthday cake

My dear friend's daughter turned 11 a few weeks ago and requested a 'Taylor Swift' cake for her birthday. She specifically wanted a 'Taylor Swift' figurine playing a guitar in a red dress so this is what I came up with. The main cake is an eggless vanilla cake covered in vanilla buttercream. I decided not to cover the cake with fondant so I had to spend a bit of time smoothing out the buttercream before piping musical notes on the side with black buttercream icing.

The name and stars are made with fondant, as is the figurine.

The birthday girl really liked her cake, as did her other friends at the party. Glad that went well!
Thanks for stopping by!
Monday, August 6, 2012
Angelina Ballerina and Tinkerbell figurines

A while ago, I was asked by one of my students if I could help her make a couple of figurines for her niece's birthday. I jumped at the challenge to make Angelina and Tinkerbell and I was really happy that she liked them. Angelina was pretty easy to do, but Tinkerbell was a challenge. I guess it's harder to try to sculpt a 'human' face than a cartoon (for me anyway) and it was my first time doing both. I was really pleased with how Angelina turned out and Tinkerbell came out alright as well I guess.

I used a long bamboo skewer as a head to toe support for both figurines as well as thin florist wires to help hold the arms and legs up. If you've ever watched Cake Boss, you will see they do something similar so I was trying to go with that in mind. I think they use modelling chocolate for their figurines as it is easier to sculpt with and perhaps even more forgiving, but I used fondant. Certainly something to try in the future with modelling chocolate. I started of making the wings for Tinkerbell with gelatine but they didnt turn out too well (too many bubbles) so I will have to work on that. As they did not have to be edible, I finally went with plastic transparency and I painted them with silver dust.
For a basic tutorial on how to make a simple fondant figurine, please click here.
Happy decorating! :)
Monday, May 28, 2012
Stargate cake
If you are a fan of the show, you will (hopefully) recognize this cake. Otherwise, you may be forgiven for thinking it is a swimming pool with a man jumping in :)

I made this cake for my hubby who is a fan of the show. It didn't start off as a stargate though. We had a long discussion (as we usually do) about what he would like for his birthday cake this year, and it always comes down to these themes: Star Wars, Star Trek, Stargate or Lord of the Rings. Well, the original plan was Minas Tirith from LOTR but I wasn't sure about making a 7 layer cake. Then we decided on the Enterprise from Star Trek, which then changed into a hobbit hole (LOTR again) and finally into Stargate. That was straightforward enough, I thought. And with so many wonderful ideas on the net from people who had made a Stargate cake (yes there are quite a few!), I started on the cake.
The cake is a chocolate mud cake covered in chocolate ganache. It has 3 layers, and for the top layer I cut out the centre before placing it on the cake. Then I cut into the inside of the ring to make it dip a little. There is an excellent video on You tube by someone who made a Stargate cake. She shows you how to cut into the ring, which I found very useful.
Here is the cake already iced with some ganache.

Next I covered the cake with light grey fondant and made some markings around the cake using a small star cutter and a knife. You could use a triangle cutter if you had one. I also used a larger star cutter (or a triangle cutter) to cut out the chevrons (triangle markers) around the cake. Cut the tip off each triangle and space them apart around the cake.

I then made some markings on each triangle with a spatula and added some red fondant to complete it. I struggled a little with the event horizon (middle bit). I thought of using blue jelly, marshmallow icing or piping gel and I am sure it would have looked great but in the end I went with something I had which was royal icing. I filled the centre with white icing and piped a border of blue around it. Then using a toothpick and brush, I blended them together till I got the effect I wanted. On hindsight, I could have made the lines more wavy than straight. To complete the cake, I used the rest of the royal icing to pipe the letters on the cake as well as some of the symbols from the Stargate.

Of course, hubby had to decide that it would look more exciting to have one of the characters jumping into the wormhole so Teal'c was made, carrying his staff weapon. :) I made him using my basic tutorial on "How to make a simple fondant figure".

I did use some wire support for the arms as it was made last minute but luckily he stayed upright ok.
Here is the cake lit. :)

Pretty cool, huh? Well hubby thought so, thank goodness! Are you a fan of the show?
Happy Birthday, sweetie, I am looking forward to our discussion about your next cake. xxx :)
Tuesday, May 8, 2012
Baseball cap cake
My friend's son was turning 15 last week so his mum asked if I could
make a simple cap cake for him as he was into collecting caps. She
wanted it to match his favourite navy blue cap. It was quite
straightforward to make and since she wanted more servings I suggested a
sheet cake underneath to make up for that. Here is the cake all ready to go.

The cap itself was made up of 2 cakes - top was from half of the Wilton sports pan and the bottom was a 6 inch round. They fit perfectly on top of each other and the only carving I needed to do was at the back to make it look like the 'material' was folded in. I covered the whole thing in navy blue fondant and used my PME quilting tool to make the stitches, mimicking the real stitches on the actual cap.

The brim of the cap was made a few days in advance with fondant mixed with a bit of gum tex so it would dry hard. I made a template using the real cap and copied that onto the fondant. (Do make sure to check that the part of the template where the brim meets the cap body fits snugly around your 6 inch cake pan, you may have to adjust it a little.)
To give the brim a curved look I rested the fondant template onto a kitchen towel roll insert. You can use anything you have to make it curve. I also added a small piece of cardboard underneath the fondant to give it some support whilst it was drying. Alternatively, you can leave the brim flat. Again I made stitches following the real cap using the quilting tool. It really is a handy tool to have in your cake decorating kit! The eyelets were made using a Wilton tip 12 to get the outer ring and the back of a paintbrush for the hole.
Assembling the cake was very straightforward. I used large straws inserted into the bottom cake under the cap to hold it up. I also used a straw under the brim as it was not completely dry and needed a bit of support. For the star border I used a Wilton tip 21 as the sheet cake was fairly large - 12 inches! For the writing, I used a Wilton tip 3.

The 'V' initial was drawn free-hand onto cardboard then traced onto fondant and cut out.
His mum was really pleased with the cake and so was the birthday boy. Always a good thing! :)
Monday, February 13, 2012
Cake Decorating Classes
If you love baking and would like to pick up some new skills on how to decorate your cakes, then come join me for a fun-filled class!
My classes are designed for beginners as well as those with some experience in cake decorating. Here are the details of the first two classes:

Class 1: How to make beautiful fondant roses
Date: 16th Feb 2012
Venue: Stonefields School (next to Mt. Wellington domain)
Time: 10.30am -12.30pm
Cost: $45

Class 2: How to make a sweet fondant teddy bear
Date: 18th, 25th Feb 2012
Venue: Stonefields School (next to Mt. Wellington domain)
Time: 10.30am -12.30pm
Cost: $45
All tools and materials are provided for use in class. Bring along a container to take your decorations home in.
I hope to see you there! :)
Monday, December 12, 2011
Russian and Welsh Wedding Cake
I had the honour and pleasure of making a cake for a student's friend this week. The bride is Russian and the groom is Welsh and they wanted a Russian doll and Welsh dragon as toppers on their cake! It was a very unusual combination but I think it came together very nicely in the end.
My friend, Jin, a very talented cake decorator, made the dragon and helped cover the cake as well. Check out how elaborate the details are on the dragon! Amazing work! I hand-painted the Russian doll from a picture that they gave to me. I was really pleased with the results.

They were very happy with the cake. It had to travel all the way to the Bay of Islands so I hope it made it ok! Here's to the happy couple. May they be blessed with lots of love and good wishes on their special day! :)

Thursday, October 27, 2011
How to make a fondant bee {Tutorial}

When I was making the farm cake for my friend's daughter, I also made some bees and ladybugs to put on cupcakes and on the main cake as well. So I decided to multi-task and take some photos along the way on how I made my ladybugs and bees.
They are both very simple to do and here is my way of making a simple fondant bee.

1. Roll a ball of yellow fondant into a tear drop.
2. Cut thin strips of black fondant and lay them over the yellow. Tuck the strips under and cut off any excess strips.
3. Roll 2 balls of white fondant into a tear drop. Press flat to form wings.
4. Use two tiny pieces of black fondant for the eyes. You can also use a toothpick and simply poke two tiny holes for the eyes. I used a modelling tool for creating the smile but you can use a small round tip and press half the tip into the front of the face to get the curve.
5. Leave to dry and then place on cake or cupcakes. I used some buttercream icing to secure it to my cake.

And there you have a very simple and easy fondant bee! I hope you have fun making them. :)
Sunday, October 16, 2011
Farm cake
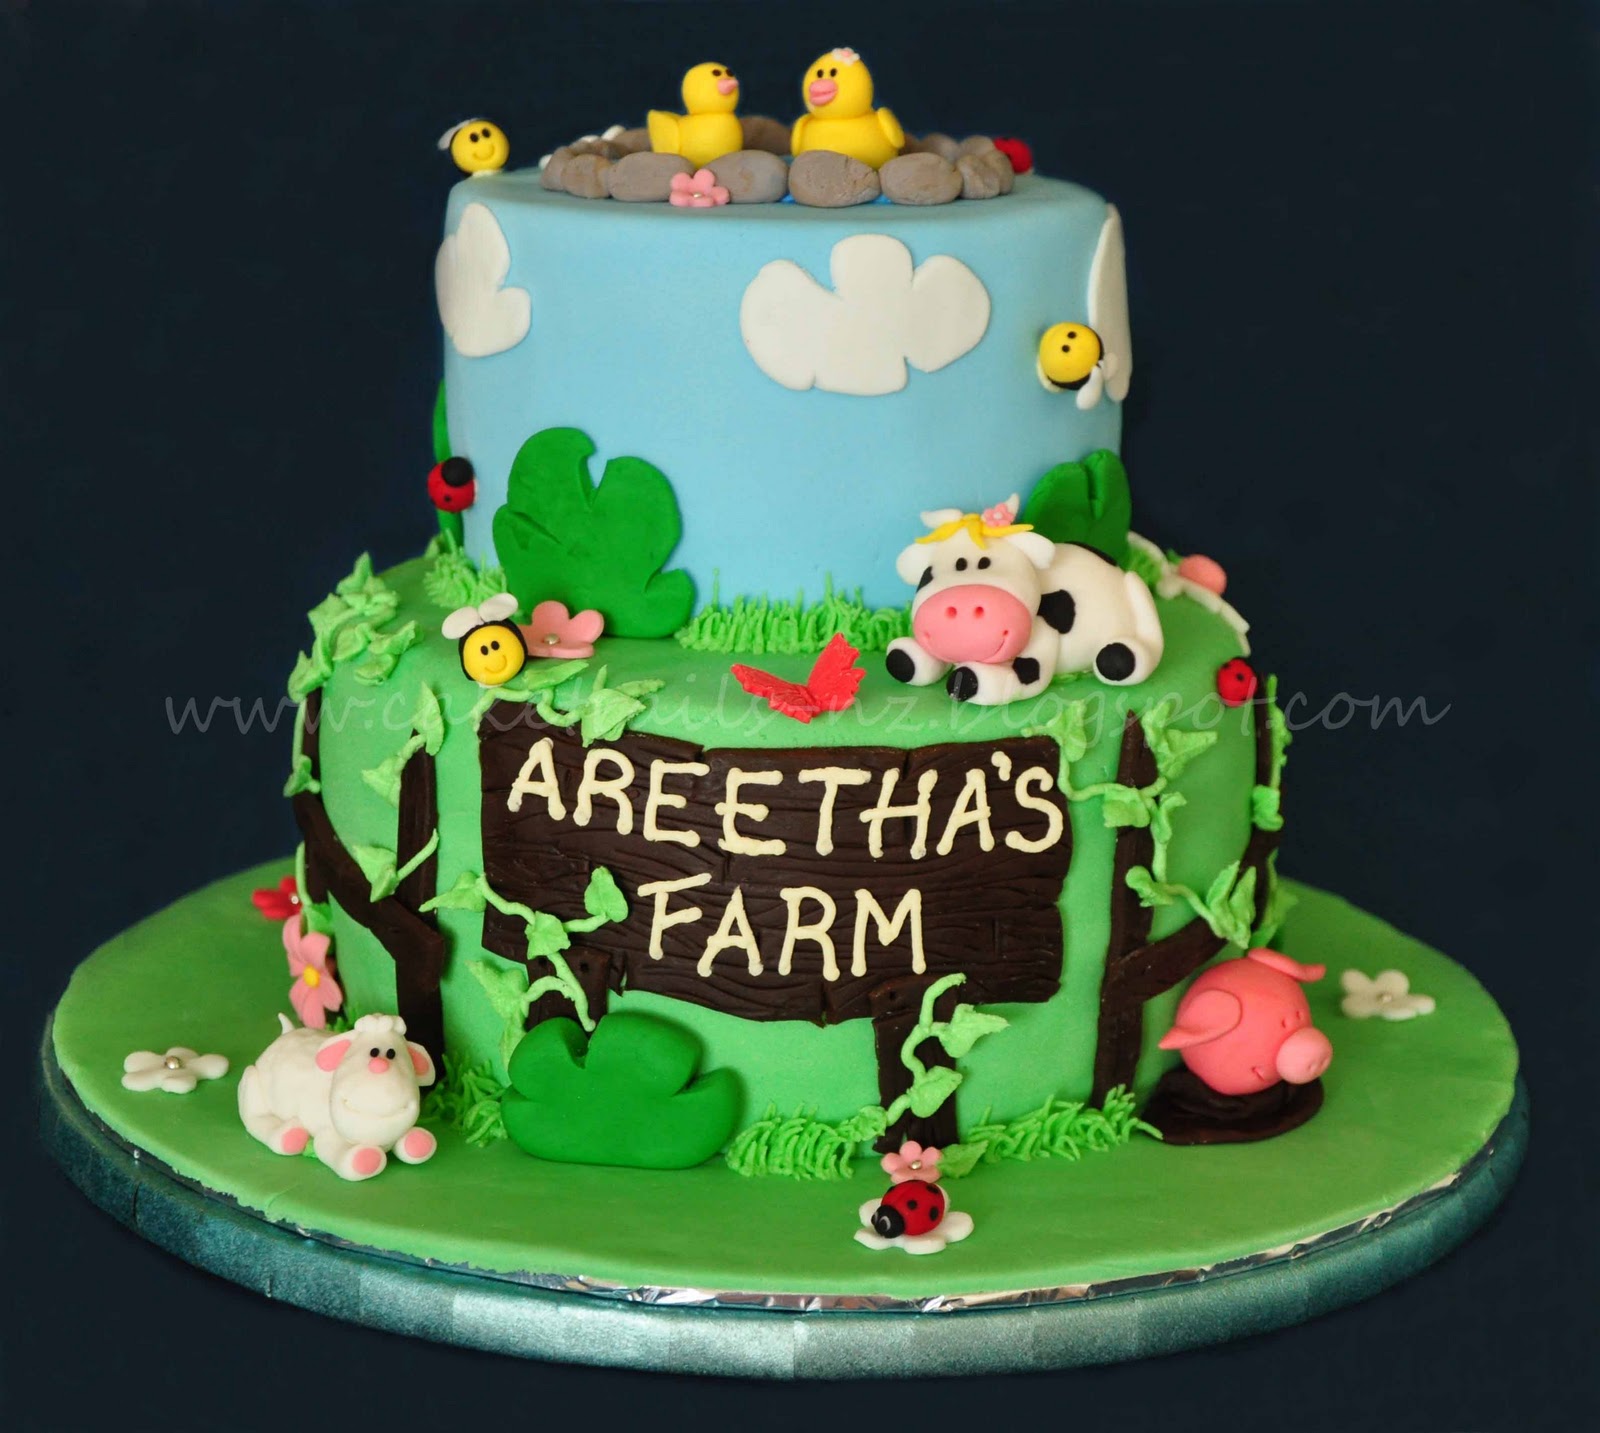
This week, I had the pleasure of doing another cake for my friend's daughter who was turning 5. Last year I did the Mermaid cake and cupcakes for her. The little girl wanted a cake with farm animals on it, so after getting some inspiration from a lot of ideas on the web, I settled for something like this. It was a lot of fun making all the fondant animals. The cake was an eggless butter cake filled with jam and cream, 4 layers in each tier and it weighed a ton! lol I used thick pearl tea (or bubble tea as some of you might know it) straws as dowels to support the top tier.
Here at the top of the cake is a little duck pond.

The grass, vines and leaves around the cake were piped in green buttercream icing. Everything else was made of fondant.

The cupcakes were covered in a rose buttercream swirl and I added a fondant butterfly to each.

I did the fence and wooden sign in chocolate fondant and used an impression mat with a wood texture to give it a more realistic look.
Mum and daughter loved the cake and I was very happy with the results too. I will have a little tutorial up soon about how to make the little ladybugs and bees. Stay tuned! :)
Happy Decorating!
Monday, September 12, 2011
How to make a simple fondant figure {Tutorial}


2. Roll a cone (slightly flattened) for the body and two sausage shapes for the arms.
3. Stick the body and arms on top of legs. Insert a toothpick (or dry spaghetti) through body to hold head.
4. Roll a ball for the head, poke eyes using a toothpick. Use a round piping nozzle or tip for the smile. Roll small balls for nose and ears. For the hands, flatten a tear drop and cut a V-shape to separate fingers from thumb.
5. Put it all together and add some hair. You can make individual sausages for the hair or a round flat disc and run a knife or scissors through the disc to make it look like hair. Add ovals for the shoes. And voila...

Get as creative as you want and enjoy making your fondant figures. There are also so many videos online nowadays that give you tons of ideas on how to make different characters. See how to make a mummy-to-be on Laura's video page. She's amazing! (Thanks for sharing Laura!) :)
It also helps me when I look at photos of characters I want to make to get a more accurate costume. Like for my cricketeer...

Most importantly, have lots of fun!
Happy decorating! :)
Sunday, August 21, 2011
Piggy's day out!
Here is a cake requested by my friend's daughter for her tenth birthday. Last year I did the castle cake for her with little Harry Potter and this year she wanted a piggy barn, one of Debbie Brown's designs.

I think it came out super cute and my friend's daughter loved it! :)
Happy baking!
Thursday, August 18, 2011
High heels

These mini high heel shoes were made using the mini high heel JEM cutters. I had lots of fun playing around with the designs of the shoes. Made me feel like a shoe designer! They were so much fun to do and would look great on cupcakes or minicakes. If you decide to get the cutters, make sure to check they are the mini ones as JEM has larger shoe cutters too.
Happy decorating! :)
Subscribe to:
Posts (Atom)